HomeKnowledge baseFresha academy
Refund a deposit
Back
  1. Knowledge base•
  2. Payments•
  3. Refund a deposit

Refund a deposit

Learn how to refund deposits that were collected from clients when securing their appointments.

In this article

  • How refunding deposits work
  • Refund a deposit
  • Refund a deposit when cancelling an appointment

How refunding deposits work

When a client pays a deposit to secure an appointment, the policy will state that the deposit is non-refundable. However, you’ll still have the option to issue a refund either while the appointment remains scheduled, or when cancelling or marking it as a no-show.

Refund a deposit

You can refund a client’s deposit while keeping their appointment scheduled in your calendar.

  1. Open an existing appointment with a deposit from your calendar.
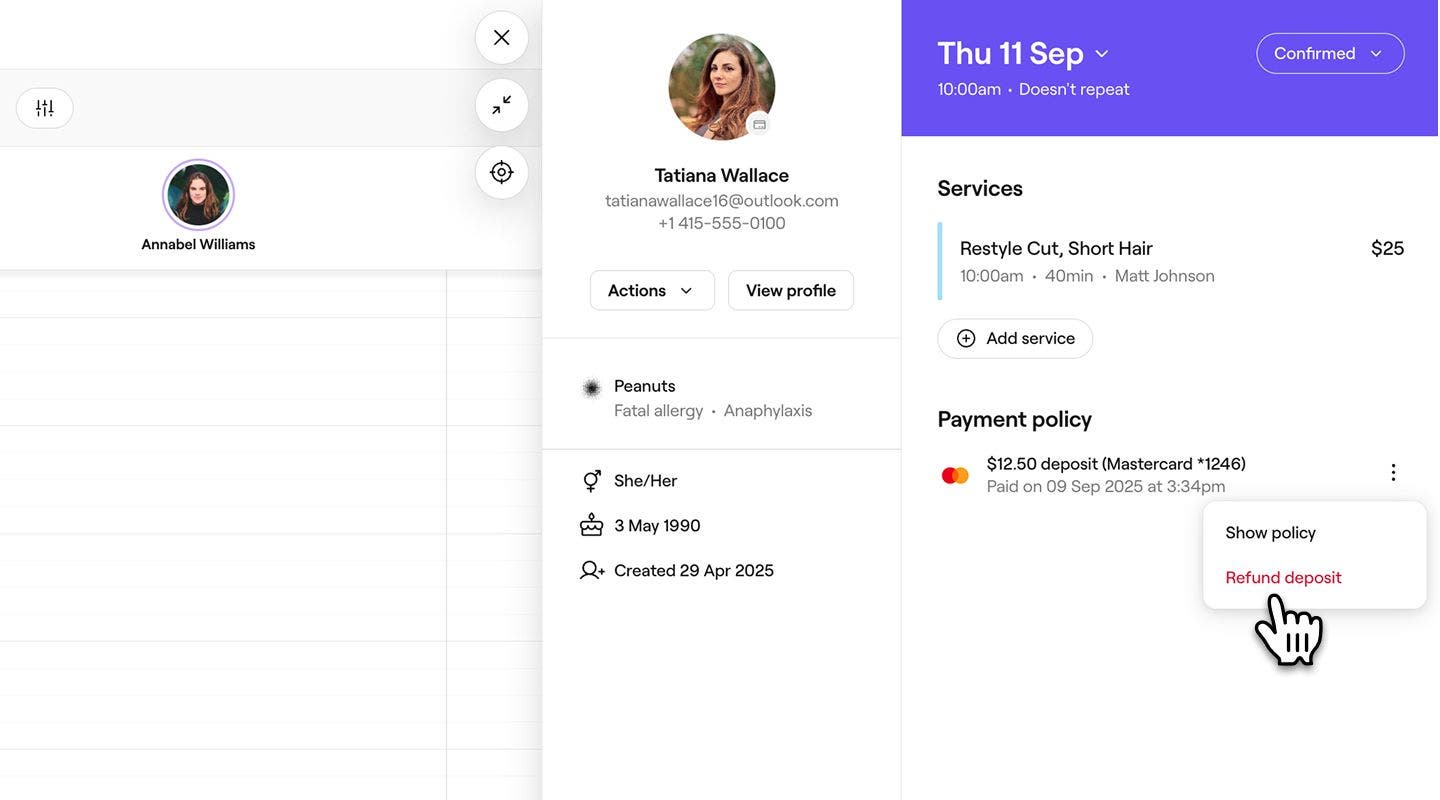
  2. In the right panel of the appointment view, select Actions (three dots) under Payment policies, then select Refund.  
    refund_deposit_web_2.jpg
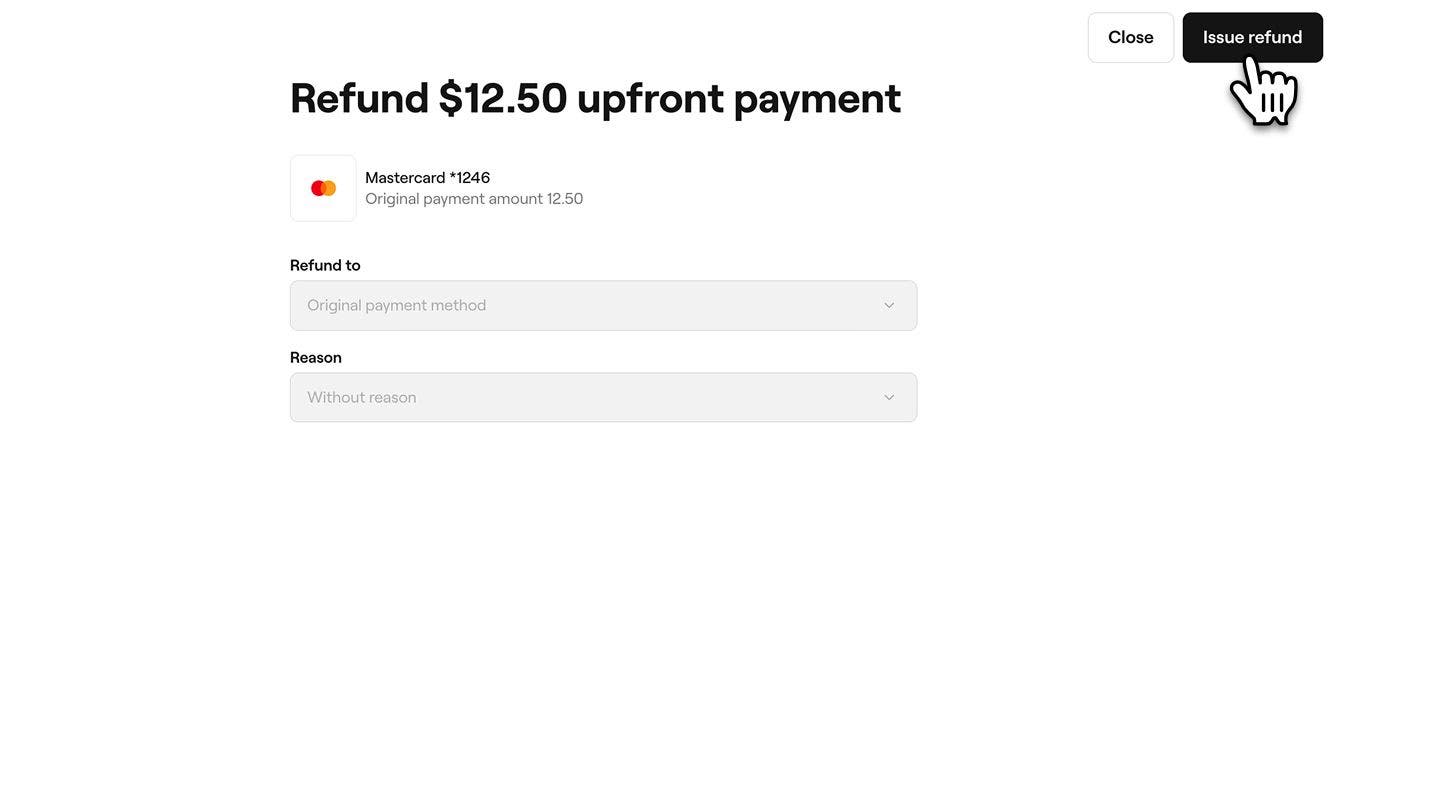
  3. On the Refund screen, the deposit is returned to the client’s original payment method, and the reason is set to Without reason.
  4. Click on the Issue refund button on the right to process the refund.
    refund_deposit_web_4.jpg
  1. Open an existing appointment with a deposit from your calendar.

  2. Under Payment policies, select Actions (three dots), then tap Refund.

    refund_deposit_mob_2.jpg

  3. On the Refund screen, the deposit is returned to the client’s original payment method, and the reason is set to Without reason.

  4. Tap on the Issue refund button at the bottom to process the refund.
    refund_deposit_mob_4.jpg

Once completed, the refund will be applied to the client's payment method within a few working days, and the appointment will remain in your calendar.

Refund a deposit when cancelling an appointment

  1. Open an existing appointment with a deposit from your calendar.
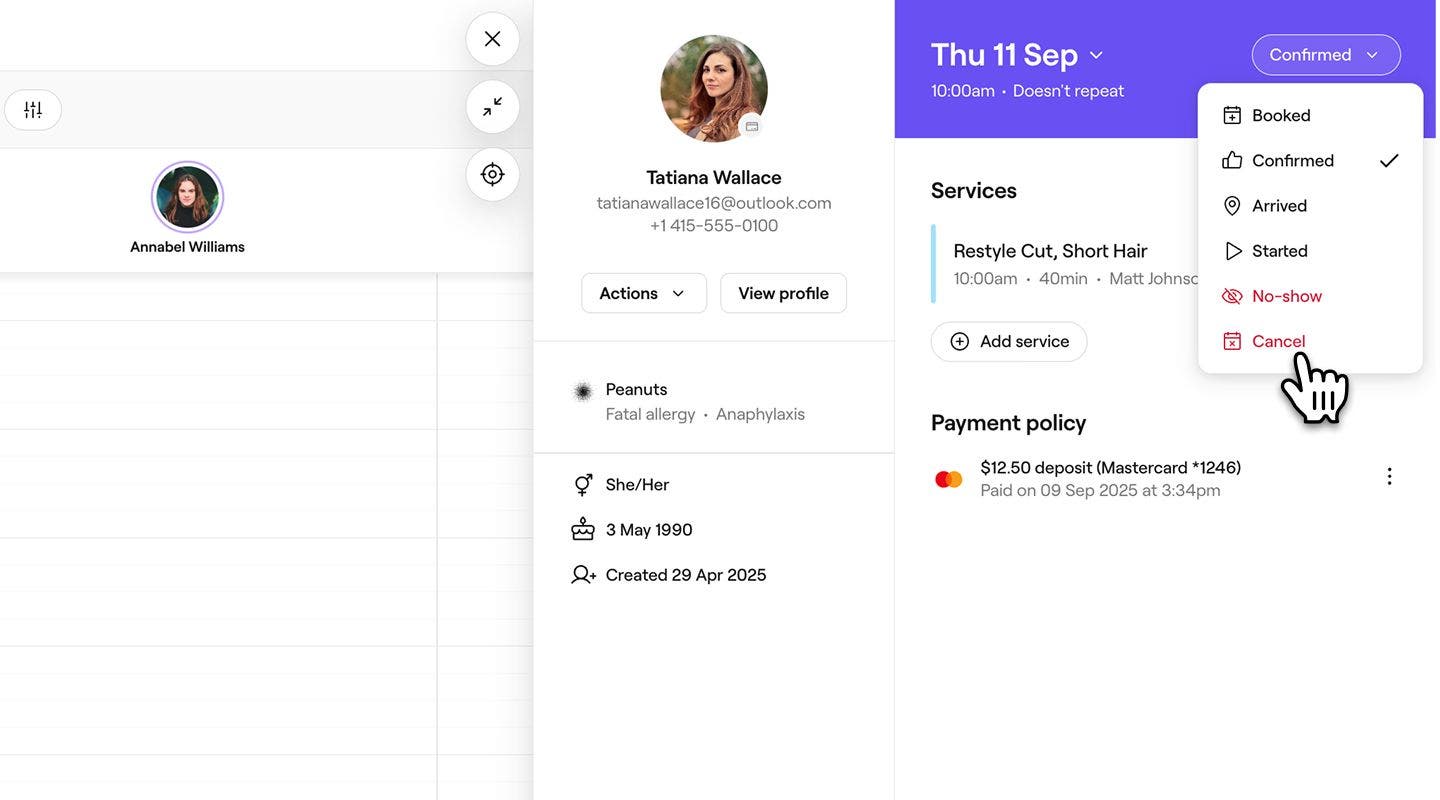
  2. In the right panel of appointment view, tap on the Appointment status in the top-right and select Cancel.
    refund_cancel_web_2.jpg
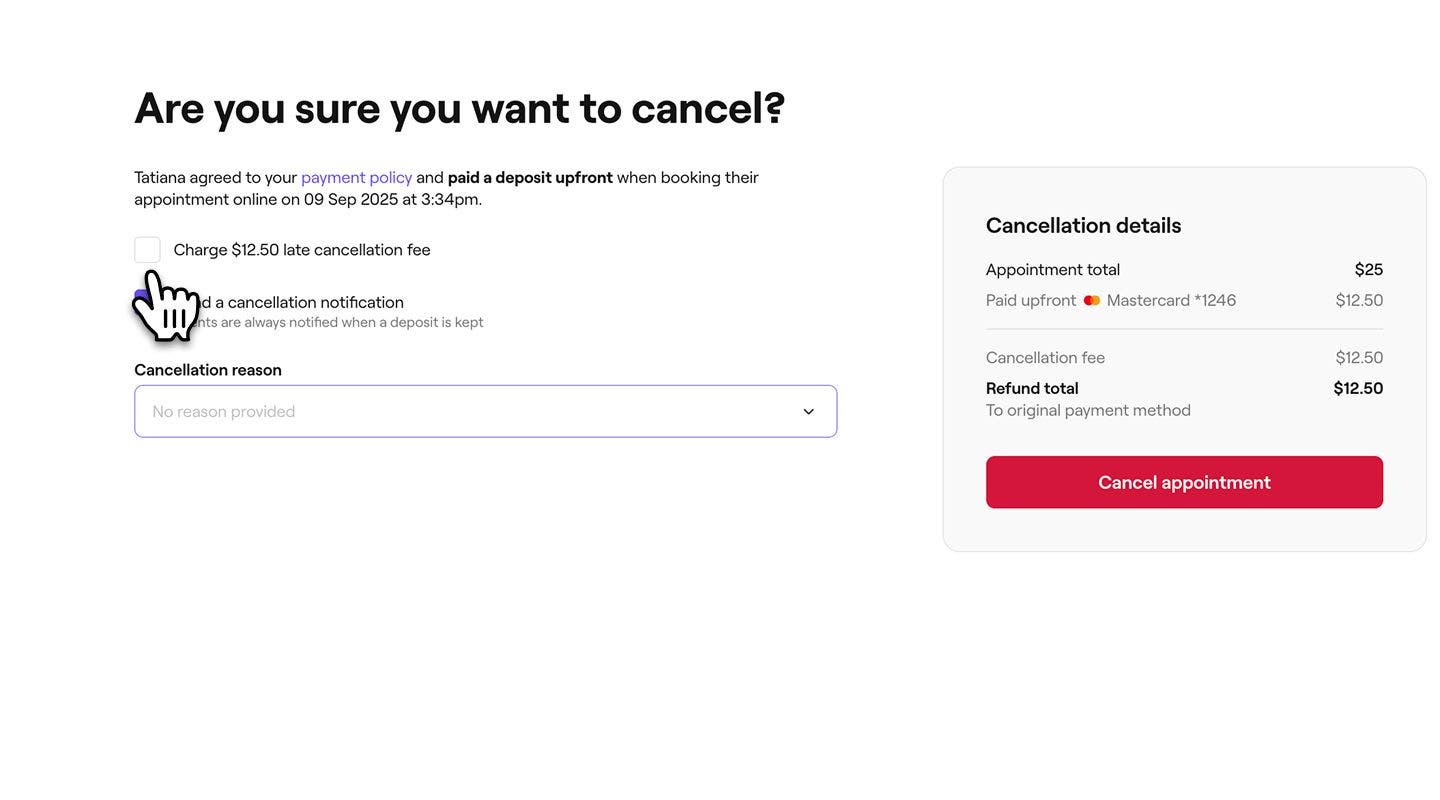
  3. On the confirmation screen, make sure the late cancellation fee checkbox is unticked.
    refund_cancel_web_3.jpg
  4. Choose whether to send a cancellation notification to the client informing them their appointment has been cancelled.
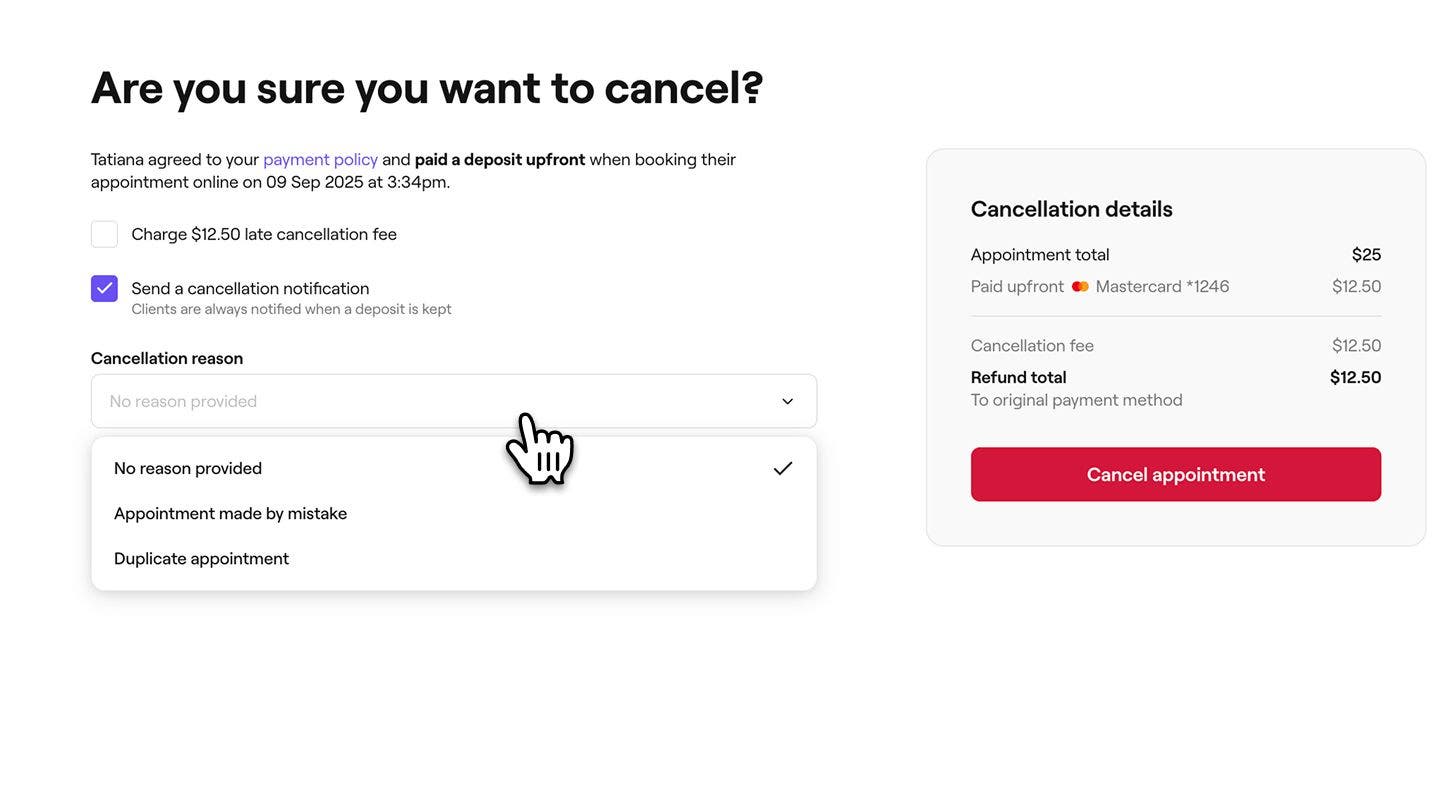
  5. Under the Cancellation reason, select a reason for the canceled appointment. You can also create new cancellation reasons from your settings.
    refund_cancel_web_5.jpg
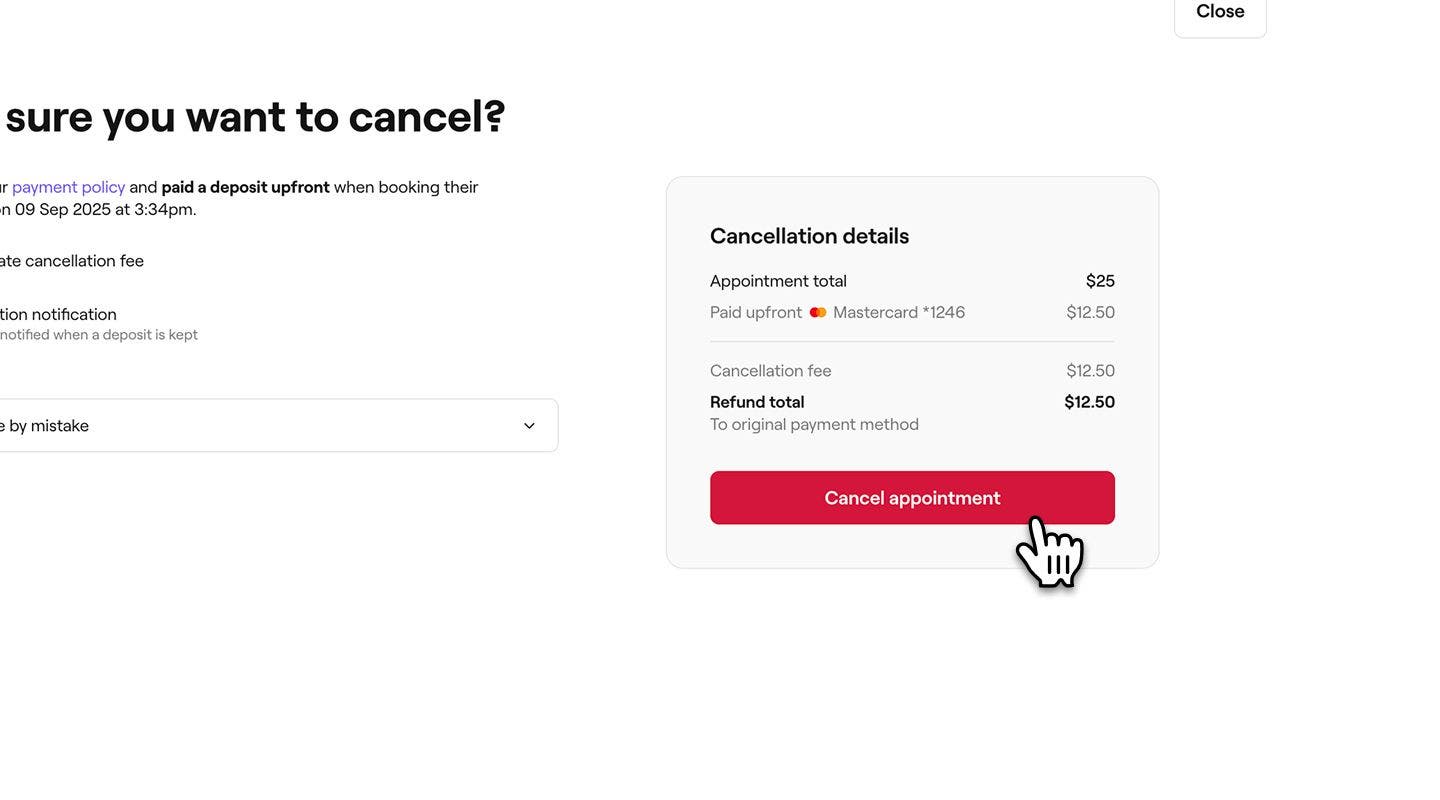
  6. Under the cancellation details, review the refund total to the client's original payment method.
  7. Click on the Cancel appointment button on the right to confirm.
    refund_cancel_web_7.jpg
  1. Open an existing appointment with a deposit payment from your calendar.
  2. In the appointment view, tap on the Appointment status at the top and select Cancel.
    refund_cancel_mob_2.jpg
  3. On the confirmation screen, make sure the late cancellation fee checkbox is unticked.
    refund_cancel_mob_3.jpg
  4. Choose whether to send a cancellation notification to the client informing them their appointment has been cancelled.
  5. Under the Cancellation reason, select a reason for the canceled appointment. You can also create new cancellation reasons from your settings.
    refund_cancel_mob_5.jpg
  6. Under the cancellation details, review the refund total to the client's original payment method.
  7. Tap on the Cancel appointment button at the bottom to confirm.
    refund_cancel_mob_7.jpg

Once completed, the refund will be applied to the client's payment method within a few working days, and the appointment will be removed from your calendar.

FAQs

    • You can manage appointment cancellation reasons in your scheduling settings. From there, you can review, edit, or add the reasons that appear when appointments are cancelled.

      Refunding deposit is processed just like any other payment refund. This means that standard payment processing fees apply. You can view the full list of rates on our pricing page.


Payment policies


Related articles

Fresha academy courses
Course video preview

Set up and explore payments

8 lessons•14 mins

See all courses

Was this guide helpful?

Payment policies

Payments policies overview

Reduce no-shows and protect your business by applying flexible payment policies to your bookings.

Set up payment policies

Secure bookings and reduce no-shows by collecting deposits or storing card details at the time of booking.

Customize payment policies when scheduling appointments

Protect bookings by applying, editing, or removing payment policies directly from an appointment.

Manage payment policies for appointments awaiting confirmation

Update, remind, or refund payment policies for existing bookings.

Collect deposits in-store

Collect deposits for specific appointments in-store.

Charge no-show and cancellation fees

Protect your revenue by applying fees or refunds to appointments with a payment policy.

Refund a deposit

Refund deposits or cancel appointments while returning deposits to clients.

Enable optional full prepayments

Give clients the option to pay their full appointment amount upfront when booking online.

Related articles

Cancel appointments

Remove unwanted or accidental bookings from your calendar to free up availability.

Mark appointments as no-shows

Track missed appointments by marking clients as no-shows when they don't attend after the scheduled time.

Update appointment statuses

Track appointments in your calendar at a glance using appointment statuses.

Fresha academy courses
Course video preview

Set up and explore payments

8 lessons•14 mins

See all courses
Fresha
Get the app

About Fresha

Careers

Help and support

Blog

Sitemap

For business

For partners

Pricing

Features

Scheduling

Point of sale

Payments

Capital

Marketplace

Support

Status

Legal

Privacy Policy

Terms of service

Terms of use

Find us on social

Facebook
Linkedin
Instagram

© 2026 Fresha.com SV Ltd