- Help center
- Knowledge base
- Calendar
Cancel appointments
Cancel appointments
Cancel accidental or unwanted appointments when clients can’t attend for clear tracking and appointment management. Learn how to manage and cancel appointments efficiently for accurate records.
Getting started
Cancellations can be made by you and your team in-store, or by clients online. To manage appointment cancellations smoothly, we suggest the following:
- Make sure you have the correct permissions to handle cancellations and access workspace settings.
- Set up capture card details to create a cancellation policy and protect your appointments.
Creating cancellation reasons
Manage reasons for your team members to choose when canceling client appointments.
- Desktop
- Mobile
To create cancellation reasons:
- Open Workspace settings, select Scheduling then Cancellation reasons.
- Click Add and enter a name for the cancellation reason. For example, “Duplicate appointment”.
- Click Add.
To create cancellation reasons:
- Open Workspace settings, select Scheduling then Cancellation reasons.
- Tap Add and enter a name for the cancellation reason. For example, “Duplicate appointment”.
- Tap Add.
Managing cancellation reasons
You can update and manage cancellation reasons at any time.
Rearrange the order of cancellation reasons
Set how you’d like cancellation reasons to be displayed in all lists.
- Desktop
- Mobile
To rearrange the order of your cancellation reasons:
- Open Workspace settings, select Scheduling then Cancellation reasons.
- Click Options and select Change order.
- Drag and drop the list of reasons into the correct order.
- Click Save order.
To rearrange the order of your cancellation reasons:
- Open Workspace settings, select Scheduling then Cancellation reasons.
- Tap Quick actions (the three dots) on the top right-hand corner and select Change order.
- Drag and drop the list of reasons into the correct order.
- Tap Save order.
You can also change the order of cancellation reasons by selecting Actions, then Move up or Move down.
Edit cancellation reasons
- Desktop
- Mobile
To edit cancellation reasons:
- Open Workspace settings, select Scheduling then Cancellation reasons.
- On the relevant reason, click Actions and select Edit.
- Change the reason name as needed.
- Click Save.
To edit cancellation reasons:
- Open Workspace settings, select Scheduling then Cancellation reasons.
- Next to the relevant reason, tap the three dots and select Edit.
- Change the reason name as needed.
- Tap Save.
Delete cancellation reasons
- Desktop
- Mobile
To delete cancellation reasons:
- Open Workspace settings, select Scheduling then Cancellation reasons.
- On the relevant reason, click Actions and select Delete.
- Select Delete to reconfirm.
To delete cancellation reasons:
- Open Workspace settings, select Scheduling then Cancellation reasons.
- Next to the relevant reason, tap the three dots and select Delete.
- Select Delete to reconfirm.
Cancelling appointments
- Desktop
- Mobile
To cancel an appointment from your calendar:
- Open the Calendar.
- Select an upcoming appointment.
- Click Quick actions (the three dots) and select Cancel. Use the dropdown to choose a cancellation reason.
- Select Cancel appointment.
Once canceled, the appointment will be removed from your calendar. If a client cancels the appointment online, you’ll also receive a message for this under Notifications (bell icon).
To cancel an appointment from your calendar:
- Open the Calendar.
- Select an upcoming appointment.
- Tap Quick actions (the three dots) on the bottom left and select Cancel.
- Use the dropdown to choose a cancellation reason.
- Select Cancel appointment.
Once canceled, the appointment will be removed from your calendar. If a client cancels the appointment online, you’ll also receive a message for this under Notifications (bell icon).
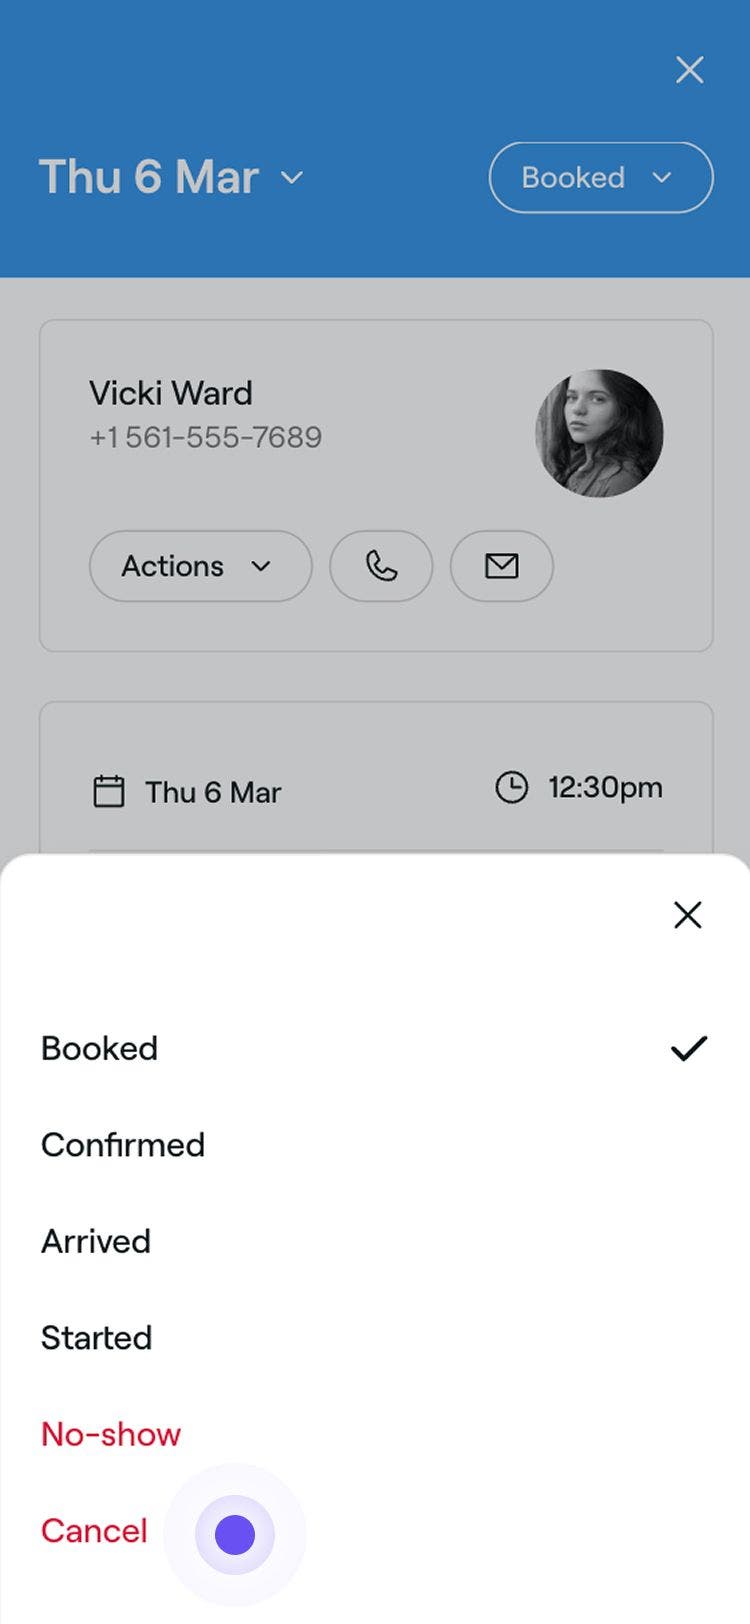
You can cancel an appointment by changing the status in the top right-hand corner.
Tracking canceled appointments
You can monitor all appointments, including canceled ones, to maintain full visibility of your calendar activity.
View canceled appointments
- Desktop
- Mobile
To view canceled appointments:
- Open Sales and select Appointments.
- Click on Filters, set the status as Canceled and Apply.
- Narrow down your search by updating the date range filter.
- View a list of canceled appointments and click on the appointment Ref to view more details.
To view canceled appointments:
- Open Sales and select Appointments.
- Tap on Filters on the top right-hand side, set the status as Canceled and Apply.
- Narrow down your search by updating the date range filter on the top centre of the page.
- View a list of canceled appointments and tap on the appointment Ref to view more details.
Reinstate canceled appointments
- Desktop
- Mobile
To reinstate appointments:
- Open Sales and select Appointments.
- Click on Filters, set the status as Canceled and Apply.
- Narrow down your search by updating the date range filter.
- From the list of canceled appointments, click on the Ref on the appointment you want to reinstate.
- Click Quick actions (the three dots) and select Rebook.
You can download data for canceled appointments by selecting Export, and choosing either PDF, Excel, or CSV depending on your preference.
To reinstate appointments:
- Open Sales and select Appointments.
- Tap on Filters, set the status as Canceled and Apply.
- Narrow down your search by updating the date range filter on the top centre of the page.
- From the list of canceled appointments, tap on the Ref on the appointment you want to reinstate.
- Tap Quick actions (the three dots) and select Rebook.
You can download data for canceled appointments by selecting Export, and choosing either PDF, Excel, or CSV depending on your preference.
FAQs
How do I select multiple appointments for cancellation?
Can I customize the cancellation reasons?
What happens to the appointment slot after cancellation?
Is it possible to recover a canceled appointment without rebooking?
How do I track client cancellations?